
Oreo sushi rolls are a fun, no-bake dessert that looks far more impressive than the effort it requires. Built from crushed Oreo cookies and a creamy filling, then rolled and sliced like sushi, this treat blends familiar flavors with a clever presentation. It’s sweet, rich, and unapologetically playful—perfect for parties, kids’ activities, or anytime you want a dessert that sparks curiosity before the first bite.
Despite the name, Oreo sushi rolls have nothing to do with traditional sushi. There’s no rice, no seaweed, and no raw fish. Instead, the “sushi” concept is all about technique and appearance: rolling, shaping, and slicing. What makes this recipe work is balance—soft but sliceable cookie dough, a smooth filling, and clean cuts that hold their shape.
Why Oreo Sushi Rolls Are So Popular
This dessert has gained popularity for several simple reasons.
-
No baking required
-
Uses familiar, widely available ingredients
-
Visually fun and conversation-starting
-
Easy to customize with fillings and toppings
Oreo sushi rolls are often made for birthday parties, school events, or casual gatherings where presentation matters as much as taste.
Equipment You’ll Need
-
Food processor or rolling pin
-
Large mixing bowl
-
Spatula
-
Parchment paper or plastic wrap
-
Sharp knife
-
Measuring spoons
Ingredients List
Oreo Dough
-
Oreo cookies
-
Milk or cream (small amount)
Filling Options
-
Cream cheese, softened
-
Powdered sugar
-
Vanilla extract
Optional Add-Ins and Toppings
-
Chocolate syrup
-
White chocolate drizzle
-
Sprinkles
-
Crushed cookies
-
Strawberries or banana slices
Timing and Servings
-
Prep Time: 25 minutes
-
Chill Time: 30 minutes
-
Total Time: About 1 hour
-
Servings: 4–6 (depending on slice size)
How to Make Oreo Sushi Rolls
Step 1: Crush the Oreos
Crush Oreo cookies into fine crumbs using a food processor or rolling pin. The texture should resemble damp sand, not chunks.
Step 2: Form the Dough
Add a small amount of milk to the crumbs and mix until a pliable dough forms. It should hold together without being sticky.
Step 3: Prepare the Filling
In a bowl, mix cream cheese with powdered sugar and vanilla until smooth. Adjust sweetness to taste.
Step 4: Roll Out the Base
Place Oreo dough between parchment paper and roll into an even rectangle. Aim for consistent thickness.
Step 5: Spread the Filling
Evenly spread the filling over the dough, leaving a small border at one edge to help seal the roll.
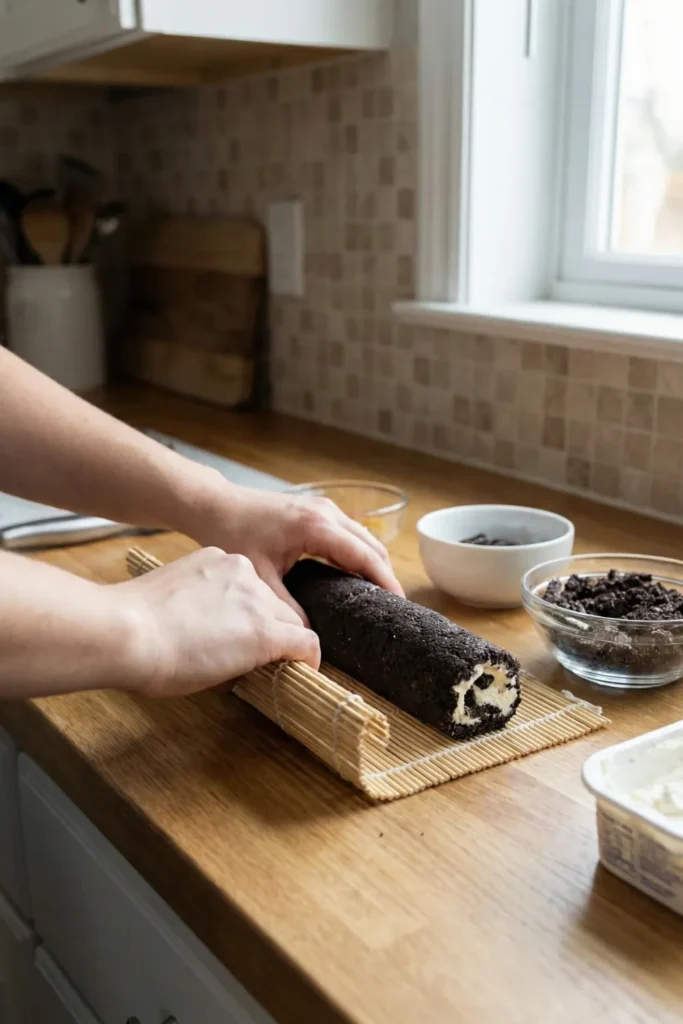
Step 6: Roll Tightly
Using the parchment paper, roll the dough tightly into a log, applying gentle pressure for a clean shape.
Step 7: Chill to Set
Wrap the roll and refrigerate until firm. This step is essential for clean slicing.
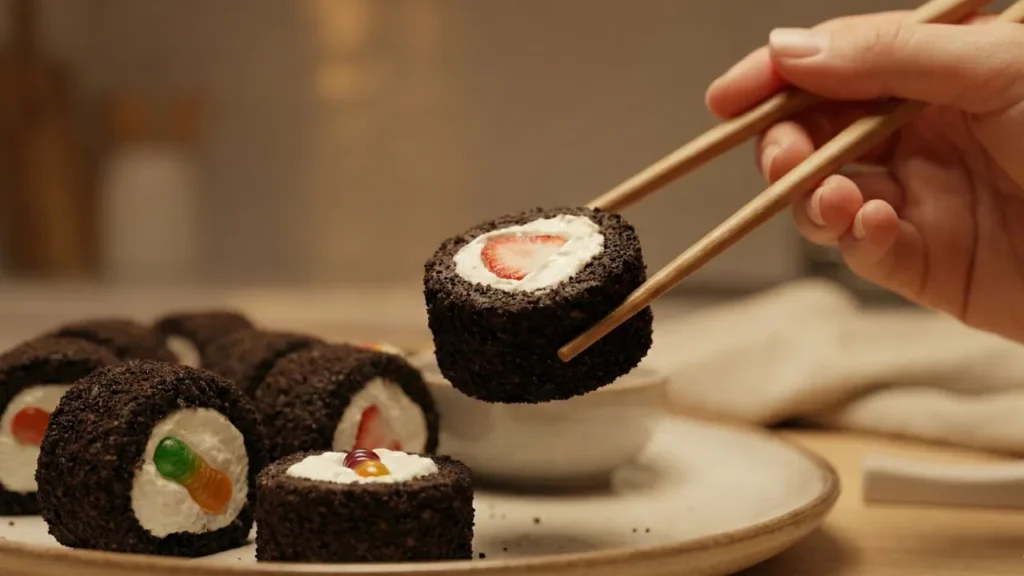
Step 8: Slice and Decorate
Slice into even rounds with a sharp knife. Drizzle or decorate as desired.
Tips for Clean, Professional-Looking Rolls
-
Chill before slicing
-
Use a very sharp knife
-
Wipe the blade between cuts
-
Roll tightly but not aggressively
Presentation improves dramatically with patience.
Why This Dessert Works Structurally
Oreo cookies contain cocoa solids and fat that bind well when crushed and moistened. That structure allows the dough to roll without cracking while still holding firm once chilled. The filling adds contrast in both color and texture, making each slice visually distinct.
This isn’t accidental—it’s a smart use of ingredients that naturally cooperate.
Choosing the Right Oreos
Classic Oreos work best.
Best Choice
-
Regular Oreo cookies with filling
Avoid double-stuff for the base dough. Extra filling makes the dough too soft and difficult to shape. If you want more creaminess, add it intentionally through the filling.
Flavor Variations Worth Trying
Chocolate Lover’s Oreo Sushi
Add Nutella or chocolate ganache to the filling.
Cookies and Cream Roll
Fold crushed Oreos into the cream cheese filling.
Strawberry Oreo Sushi
Add thin strawberry slices inside the roll.
Peanut Butter Oreo Rolls
Mix peanut butter into the filling for richness.
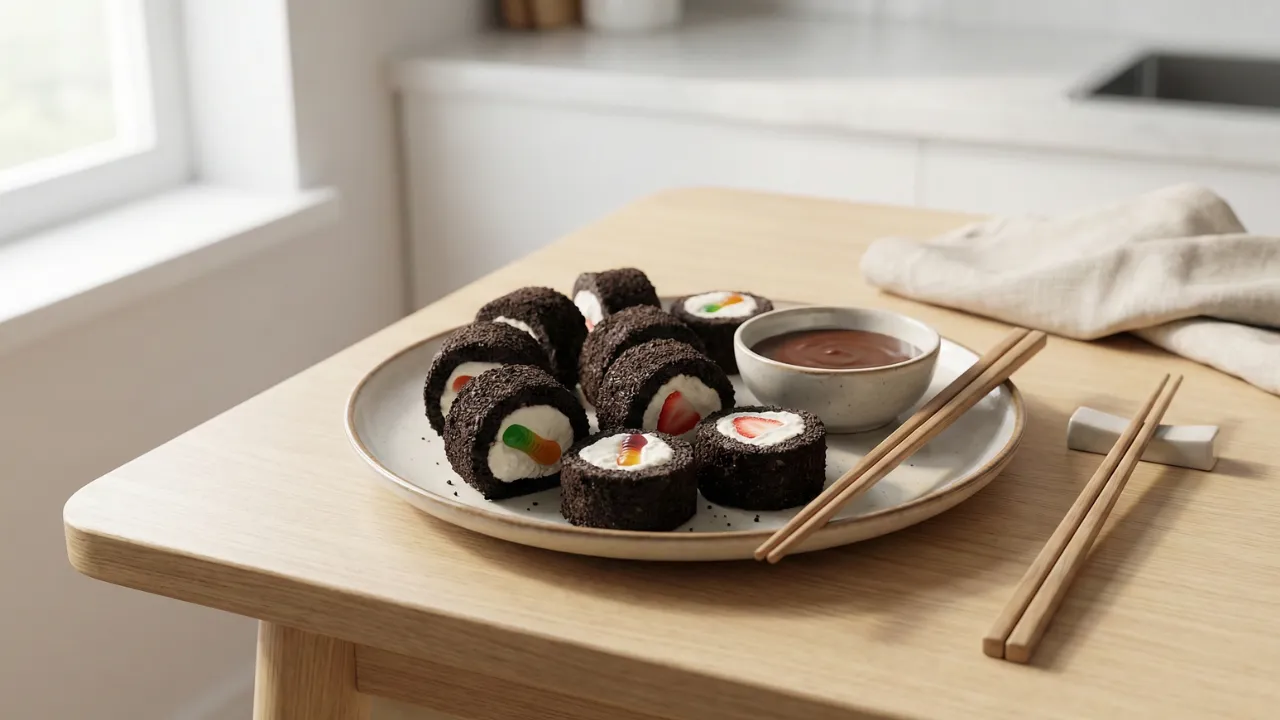
Serving Suggestions
Oreo sushi rolls work best when served chilled.
-
Arrange on a platter like sushi
-
Pair with chocolate or berry sauces
-
Serve with small dessert forks
They’re ideal for dessert tables where guests can grab a piece easily.
Make-Ahead and Storage Tips
-
Store refrigerated up to 3 days
-
Keep tightly wrapped to prevent drying
-
Slice just before serving for best appearance
Freezing is not recommended, as texture suffers when thawed.
Common Mistakes to Avoid
-
Adding too much liquid to the dough
-
Skipping the chilling step
-
Rolling uneven thickness
-
Using a dull knife
Each of these affects structure and presentation.
Why Oreo Sushi Rolls Are So Appealing
This dessert succeeds because it’s familiar but unexpected. Everyone knows Oreos, but very few expect them to appear as “sushi.” That contrast creates curiosity, and the rich, creamy flavor delivers on the promise. It’s a reminder that desserts don’t need complexity to feel special—sometimes they just need creativity.
Nutritional Facts (Approximate per Serving)
-
Calories: 320
-
Protein: 4 g
-
Carbohydrates: 38 g
-
Fat: 17 g
-
Sugar: 25 g
This is an indulgent dessert meant for enjoyment, not moderation.
If you’re building a dessert menu, Lemon Lavender Cookies, Homemade Dutch Apple Pie, or No-Bake Rhubarb Cheesecake Squares are must-tries.
Ingredients
Equipment
Method
- Crush Oreo cookies into fine crumbs using a food processor or rolling pin. The texture should resemble damp sand, not chunks.
- Add a small amount of milk to the crumbs and mix until a pliable dough forms. It should hold together without being sticky.
- In a bowl, mix cream cheese with powdered sugar and vanilla until smooth. Adjust sweetness to taste.
- Place Oreo dough between parchment paper and roll into an even rectangle. Aim for consistent thickness.
- Evenly spread the filling over the dough, leaving a small border at one edge to help seal the roll.
- Using the parchment paper, roll the dough tightly into a log, applying gentle pressure for a clean shape.
- Wrap the roll and refrigerate until firm. This step is essential for clean slicing.
- Slice into even rounds with a sharp knife. Drizzle or decorate as desired.
Conclusion
Oreo sushi rolls are a playful, no-bake dessert that combines visual appeal with rich, crowd-pleasing flavor. With a soft Oreo base, creamy filling, and clean slices, they’re easy to make and even easier to enjoy. Whether served at a party, made with kids, or prepared as a fun weekend treat, this recipe proves that simple ingredients can still create memorable results.
Frequently Asked Questions
Do Oreo sushi rolls contain raw ingredients?
No. All ingredients are ready-to-eat.
Can I make these ahead of time?
Yes. They store well refrigerated for up to three days.
Why is my dough cracking?
It’s too dry. Add a few drops of milk and re-knead gently.
Can I make this without cream cheese?
Yes. Frosting or chocolate spread can be used instead.
Are Oreo sushi rolls freezer-friendly?
No. Freezing affects texture and structure.